

|
|
|||||||
| Home | Forum | Registrarse | Mini-Banners  |
Miembros | Calendario |
| E30 owners (1983-1991) |
|
|

|
 |
 Este thread fue creado hace 4879 días. Lo mas probable es que el tema ya se haya resuelto y no necesite más discusión. Aunque si todavía crees que es necesario agregar un comentario, puedes hacerlo. Este thread fue creado hace 4879 días. Lo mas probable es que el tema ya se haya resuelto y no necesite más discusión. Aunque si todavía crees que es necesario agregar un comentario, puedes hacerlo.
|
|
|
Herramientas |
 01-Dec-2010, 09:50
|
#1 |
|
Banned
Fecha de Ingreso: 21-September-2010
Mensajes: 614
Feedback Score: 0 reviews
|
Guia para instalar un ventilador electrico
Adjunto este archivo para que tengan una idea de como instalar un ventilador electrico para su E30
Toda instalacion es responsabilidad del propietario del vehiculo, si van a utilizar este documento como guia favor leer varias veces y estar seguro de lo que se hace, a mi me funciono correctamente mas no me hago responsable si algo les sale mal, en ultimo caso consultar un electromecanico de confianza Recomendaciones: * leer detenidamente * asegurarse de las conecciones electricas * usar espigas (machos / embras) nuevos y de calidad * usar un buen Relay (hella o bosch) * usar cinta adhesiva resistente a altas temperaturas y NUEVA, de preferencia usar aislantes de calor Hagan uso del diagrama que mas les guste, algunos pueden optar por que el ventilador se apague en el momento que desconecten la llave, otros quizas les guste como volkswagen que aun el carro permanece con el ventilador trabajando hasta que la temperatura de la señal de apagado Fan Choice There are many aftermarket electric fans available, but few have been proven to cool well enough to be used on the rotary. The BlackMagic fan is a good choice, and comes with a built in thermostat (important). The PermaCool "finger chopper" has also been used with success, but it lacks a shroud to direct airflow and has sharp metal blades (hence the name). Another option is to transplant a fan from another car. Electric fans are common in wrecking yards. However, please remember that a wussy 4-cylinder fan is not going to cool a rotary. The only junkyard fan recommended on a constant basis is that from the Pontiac Fiero GT. It's rear engine configuration means that airflow through the front mounted radiator is important. I personally use the fan from a V6 Pontiac 6000 on my 2nd gen. This fan is common to most medium to larger sized GMs of the era. You can find them on the Oldsmobile Delta/Royale, Pontiac Grand Prix/Grand Am and several Buicks. The fan has a shroud that almost perfectly fits on the 2nd gen radiator. If you don't want to use a fan from the "approved" list, just remember two important points:
Mounting For the most part, the e-fan is a pretty lightweight creature. This means that mounting is fairly simple. Overall, the best way to mount is to fab up a set of metal brackets that attach to the radiator support brackets, and then to the fan mounting tabs. Normally this is done using standard hardware-store angle iron. An example of this can be seen below. Brackets were made by cutting two pieces of 3MM steel about 3.5" x 1.5" and 1.5" x 1.5" and then welding them at a right angle. Mounting holes were drilled in the bracket and the fan shroud. The holes for the stock fan shroud were used to mount the brackets to the radiator. 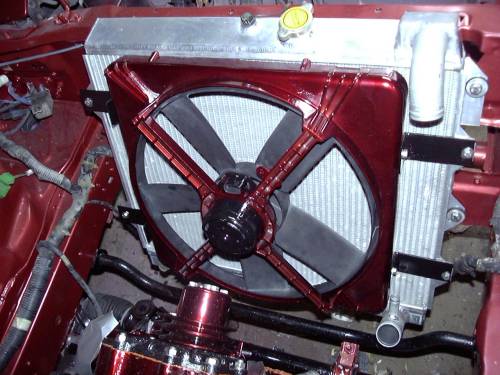 The above method is the best way to mount the fan, however, it is perfectly acceptable to secure the fan directly to the radiator (if the fan mounting configuration will allow this) with zip ties. Most fans are fairly lightweight and thus don't require a huge amount of support. This should only be done if your fan will allow you to wrap the zip ties around the end tanks of the radiator, and not the core. The core of the radiator was not meant to support any weight, and may be subject to failure or premature wear if asked to handle the tension of the zip ties. For example, the Pontiac 6000 fan is a perfect fit on the stock 2nd gen rad. Once placed, the support ribs in the shroud sit just below the end tank, allowing you to drill a small hole in the rib and thread a zip tie through it and around the end tank. Try to avoid the plastic fan mounting ties made for this purpose (they look like a ribbed string with a disk at each end) as they will damage radiator fins and put all the weight and tension onto the core. The above method is the best way to mount the fan, however, it is perfectly acceptable to secure the fan directly to the radiator (if the fan mounting configuration will allow this) with zip ties. Most fans are fairly lightweight and thus don't require a huge amount of support. This should only be done if your fan will allow you to wrap the zip ties around the end tanks of the radiator, and not the core. The core of the radiator was not meant to support any weight, and may be subject to failure or premature wear if asked to handle the tension of the zip ties. For example, the Pontiac 6000 fan is a perfect fit on the stock 2nd gen rad. Once placed, the support ribs in the shroud sit just below the end tank, allowing you to drill a small hole in the rib and thread a zip tie through it and around the end tank. Try to avoid the plastic fan mounting ties made for this purpose (they look like a ribbed string with a disk at each end) as they will damage radiator fins and put all the weight and tension onto the core. However you mount your fan, make sure that it is securely in place and cannot rub the radiator core/fins, or crash into the radiator when you go over a large bump. Shrouding The fan shroud is very important. It's job is to force the fan to pull air through the entire radiator. Without it, the fan will only pull air through the area directly in front of it's blades, as well as the side between the blades of the fan and the radiator. All this does is churn hot engine bay air. The major downfall of the Permacool "finger chopper" is it's lack of a shroud. Both the Blackmagic and Pontiac 6000 fans have shrouds that almost perfectly fit the stock 2nd gen radiator. The Fiero fan may or may not have a shroud, depending on which year of Fiero you get it from. Wiring This is perhaps the most critical section, and probably the most overlooked and misunderstood. There are many wrong ways to wire an e-fan, and they all are demonstrated during the frequent electric fan discussions on the various forums and mailing lists. Probably the worst thing that people do is to wire the fan to a switch in the cockpit. This is the Zen concept of your "inner thermostat". Unfortunately, this built in thermostat is unreliable. The idea here is that you watch the temperature gauge, and manually turn the fan on at idle or when the temps begin to climb during low-speed creeping. The flaw in this idea should be obvious. For one thing, people are far from perfect, and can easily forget to engage the fan. In addition, the temperature gauge in the '89+ cars is horrible. By the time it has moved from it's normal (middle) position, the car is already too hot. It is entirely possible to have a defective temperature gauge, and the stock unit is only a relative indication of the true temperature of the car. The opposite of this is to wire the fan to operate anytime the car is running. It is connected directly to a 12V IGN source, perhaps through a relay. There is a major problem with this setup in that the fan is only required when sitting stationary or driving slowly. At cruise, a spinning fan is just an unnecessary load on the electrical system. The fan loads an already factory-overloaded electrical system since the factory 2nd gen alternator is either rated at 70A ('86-'88) or 90A ('89-'92). These ratings are optimistic, and actual output is somewhat less. Adding a constant 10A draw on this system is quite a bit of stress. In addition, even if you did free up a miniscule amount of engine horsepower by removing the slight inertia of the stock fan clutch, you are now burning it up (and more!) as the alternator puts more strain on the engine to produce the current necessary to run the fan. Now that we've covered what you shouldn't do, we will explain how to correctly wire your fan. The most important concepts are: fuse, thermostat, relay. The fuse is perhaps the most important part, as it is all that stands between a wiring problem and electrical meltdown. It is critical that this fuse be located as close to your +12V source as possible, and be rated for "just enough" current to start and run the fan without allowing much overhead. This is one part most commonly missed. The thermostat (or thermal switch) is simply the control device. The thermostat in your cooling system controls water flow through the rad depending on engine temperature. The fan thermostat controls the fan, turning it on when needed and off when not. These thermostats are available from most electric fan suppliers, as well as Summit Racing. Searching the Summit online catalogue for "thermostat" or "fan switch" will quickly turn up several. The best are all electronic, but the electromechanical work as well. Just be aware that they may stick if they get dirty. As far as I know, all fan thermostats are adjustable, but you might want to verify that the model you are looking at is before you buy. Skipping the thermostat and just using a switch is not recommended, for reasons explained above. Even though most thermostats have high-current contacts built in, it is important that you use a relay to switch the fan. As mentioned, electric fans pull large startup currents. This causes arcing on the switching contacts, which will wear them out over time. Using a relay means that you will wear the contacts in a cheap relay, and not an expensive thermostat. The relay is also designed for high-current abuse, whereas the thermostat contacts might not be as robust. Now that we've covered the basics of what you need, let's wire it up. As you can see on the schematic below, it is fairly straightforward.  The schematic above will activate the fan anytime the coolant temperature is above the threshold of the thermostat. This means that the fan could continue to run for a few minutes even after the engine is shut off (on hot days). To avoid this, and set up the fan so that it can only run when the engine is on, use the schematic below instead. The schematic above will activate the fan anytime the coolant temperature is above the threshold of the thermostat. This means that the fan could continue to run for a few minutes even after the engine is shut off (on hot days). To avoid this, and set up the fan so that it can only run when the engine is on, use the schematic below instead.  If your car is a 2nd gen RX-7, then switched 12V can come from the green 6 pin diagnostic connector near the battery (black/yellow wire). Otherwise, the black/yellow wire near the leading ignition coil is another good choice. If your car is a 2nd gen RX-7, then switched 12V can come from the green 6 pin diagnostic connector near the battery (black/yellow wire). Otherwise, the black/yellow wire near the leading ignition coil is another good choice. If your car is a 1st gen RX-7 you will find that the black/white wire around the ignition area to be a good source of a switched 12V signal. Power for high current devices like fans should be taken directly from the battery. This avoids loading down other circuits which may not be able to handle high currents. The fuse is absolutely necessary, and should be located as close (physically and electrically) to your 12V source as possible. 30A is a typical value, but if you can get by with a smaller fuse by all means use one. You will see that we use the thermostat to activate the relay, which then switches the fan. Grounding can be any common source, but it is best to make your ground as short as possible. If you use the chassis as ground, make sure to scrape away any paint that could interfere with your connection. The thermostat will typically have a probe that is to be positioned on the radiator somewhere. I like to put mine into the fins in the corner where the upper rad hose connects. This is the hottest area of the radiator, and a generally convenient spot. It should go without saying that the thermostat be located away from moisture, dirt and excessive heat. Now that you have everything wired up, the thermostat will need adjusting. Start conservatively with the fan coming on well below operating temperature, and then gradually increase the temperature setting until the fan maintains the proper (quarter gauge on the '86-'88 cars, half gauge on the 89+ cars) temperature. If you are unsure as to the accuracy of your stock temperature gauge, you absolutely must verify your readings with another source. Either an aftermarket temperature gauge (with it's sender installed before the thermostat) or a thermometer. The fan should turn on around 190 degrees or so in most cases as the thermostat is supposed to open around 177-183 degrees F. The fan should not fight the water-thermostat in maintaining temp, and should only run for a few seconds after the car is turned off (unless the car is very hot). |

|

|
| Sponsored Links |
||||||
|
|
01-Dec-2010, 13:28
|
#2 |
|
Sideways
Fecha de Ingreso: 12-December-2006
Ubicación: guatemala
BeEme
Tiempo: ..../...
Mensajes: 15.232
Feedback Score: 15 reviews
|
Re: Guia para instalar un ventilador electrico
Buen info!
__________________

|
|
|
|
|
03-Dec-2010, 09:23
|
#3 | |
|
///Bimmero
Fecha de Ingreso: 22-January-2008
E36 - 2002 - 1200
Tiempo: 11
Mensajes: 8.930
Feedback Score: 225 reviews
|
Re: Guia para instalar un ventilador electrico
Cita:
 |
|
|
|
|
|
03-Dec-2010, 11:30
|
#4 | |
|
Banned
Fecha de Ingreso: 21-September-2010
Mensajes: 614
Feedback Score: 0 reviews
|
Respuesta: Re: Guia para instalar un ventilador electrico
Cita:
fuck fan clutch en Bimmers  |
|
|
|
|
|
03-Dec-2010, 11:34
|
#5 | |
|
Sideways
Fecha de Ingreso: 12-December-2006
Ubicación: guatemala
BeEme
Tiempo: ..../...
Mensajes: 15.232
Feedback Score: 15 reviews
|
Re: Guia para instalar un ventilador electrico
Cita:
Despues de que termine lo que quiero hacer ahorita ya me meto con eso  |
|
|
|
|
|
04-Dec-2010, 02:14
|
#6 | |
|
*****
Fecha de Ingreso: 27-July-2006
toyota
Tiempo: :pela:
Mensajes: 32.933
Feedback Score: 255 reviews
|
Respuesta: Re: Guia para instalar un ventilador electrico
Cita:
 como que es motor de 22R o pickup nissan HB como que es motor de 22R o pickup nissan HB |
|
|
|
|
|
05-Dec-2010, 10:40
|
#7 |
|
Senior Member
Fecha de Ingreso: 16-April-2008
E-30 318 is
Tiempo: Probando
Mensajes: 976
Feedback Score: 3 reviews
|
Respuesta: Guia para instalar un ventilador electrico
Buena info...
__________________
 |
|
|
|
|
05-Dec-2010, 11:05
|
#8 |
|
Bullittproof...
Fecha de Ingreso: 04-June-2006
Turbomustang
Tiempo: 12.01/8.10
Mensajes: 40.821
Feedback Score: 7 reviews
|
Respuesta: Guia para instalar un ventilador electrico
los mas eficiente es el fan clutch, conseguir un ventilador que tire los mismos cfms que un fan clutch sin que consuma mucho amperaje es dificil pero si hay
 y no pongan cualquier ventilador pq no todos fluyen igual y no pongan cualquier ventilador pq no todos fluyen igual
__________________
BMV Motorsports Making the fastest car faster!
  |
|
|
|
|
05-Dec-2010, 11:08
|
#9 |
|
Bullittproof...
Fecha de Ingreso: 04-June-2006
Turbomustang
Tiempo: 12.01/8.10
Mensajes: 40.821
Feedback Score: 7 reviews
|
Respuesta: Guia para instalar un ventilador electrico
y no usen el del a/c como ventilador principal
 ese no fluye lo necesario para enfriar los suficiente ese no fluye lo necesario para enfriar los suficiente  sdfghsdfg sdfghsdfg |
|
|
|
|
06-Dec-2010, 09:00
|
#10 | |
|
Senior Member
Fecha de Ingreso: 06-June-2006
Tiempo: 10 1/8
Mensajes: 3.812
Feedback Score: 7 reviews
|
Respuesta: Guia para instalar un ventilador electrico
Cita:
__________________
"GOD CREATED LAG TO GIVE V8's A CHANCE" "A car that is hard to control is not fast" |
|
|
|
|
|
06-Dec-2010, 16:42
|
#11 | |
|
Sideways
Fecha de Ingreso: 12-December-2006
Ubicación: guatemala
BeEme
Tiempo: ..../...
Mensajes: 15.232
Feedback Score: 15 reviews
|
Re: Respuesta: Guia para instalar un ventilador electrico
Cita:
|
|
|
|
|
|
06-Dec-2010, 16:50
|
#12 | |
|
Banned
Fecha de Ingreso: 21-September-2010
Mensajes: 614
Feedback Score: 0 reviews
|
Respuesta: Re: Respuesta: Guia para instalar un ventilador electrico
Cita:
depende, por ejemplo un ventilador electrico mishimoto de 10inches produce 850 cfm uno de 12 inches produce 933 y 954 cfm el de 14 osea que estos rangos estarian dentro lo normal para el enfriamiento de un e30 |
|
|
|
|
|
06-Dec-2010, 16:51
|
#13 | |
|
Sideways
Fecha de Ingreso: 12-December-2006
Ubicación: guatemala
BeEme
Tiempo: ..../...
Mensajes: 15.232
Feedback Score: 15 reviews
|
Re: Respuesta: Re: Respuesta: Guia para instalar un ventilador electrico
Cita:
Vos ya hiciste ese cambio me imagino.. donde lo compraste? |
|
|
|
|
|
06-Dec-2010, 17:06
|
#14 | |
|
Banned
Fecha de Ingreso: 21-September-2010
Mensajes: 614
Feedback Score: 0 reviews
|
Respuesta: Re: Respuesta: Re: Respuesta: Guia para instalar un ventilador electrico
Cita:
|
|
|
|
|
|
06-Dec-2010, 20:01
|
#15 | |
|
///Bimmero
Fecha de Ingreso: 22-January-2008
E36 - 2002 - 1200
Tiempo: 11
Mensajes: 8.930
Feedback Score: 225 reviews
|
Re: Respuesta: Re: Respuesta: Re: Respuesta: Guia para instalar un ventilador electri
Cita:
|
|
|
|
|
|
06-Dec-2010, 22:19
|
#16 | |
|
Bullittproof...
Fecha de Ingreso: 04-June-2006
Turbomustang
Tiempo: 12.01/8.10
Mensajes: 40.821
Feedback Score: 7 reviews
|
Respuesta: Guia para instalar un ventilador electrico
Cita:
 para un 316 talvez funcione bien... para un 316 talvez funcione bien... |
|
|
|
|
|
07-Dec-2010, 08:19
|
#17 | |
|
Senior Member
Fecha de Ingreso: 06-June-2006
Tiempo: 10 1/8
Mensajes: 3.812
Feedback Score: 7 reviews
|
Respuesta: Re: Respuesta: Guia para instalar un ventilador electrico
Cita:
|
|
|
|
|
|
07-Dec-2010, 08:47
|
#18 | |
|
Banned
Fecha de Ingreso: 21-September-2010
Mensajes: 614
Feedback Score: 0 reviews
|
Respuesta: Re: Respuesta: Guia para instalar un ventilador electrico
Cita:
|
|
|
|
|
|
07-Dec-2010, 11:29
|
#19 |
|
Bullittproof...
Fecha de Ingreso: 04-June-2006
Turbomustang
Tiempo: 12.01/8.10
Mensajes: 40.821
Feedback Score: 7 reviews
|
Respuesta: Guia para instalar un ventilador electrico
depende del angulo de las aspas, cuantas aspas tenga, que tan rapido gire, la forma de la tolva, etc etc.. no solo del diametro...
|
|
|
|
|
07-Dec-2010, 20:10
|
#20 | |
|
Banned
Fecha de Ingreso: 21-September-2010
Mensajes: 614
Feedback Score: 0 reviews
|
Respuesta: Guia para instalar un ventilador electrico
Cita:
mishimoto.com flat engine, especificaciones para e30 - e36 |
|
|
|
|
|
08-Dec-2010, 00:03
|
#21 |
|
Bullittproof...
Fecha de Ingreso: 04-June-2006
Turbomustang
Tiempo: 12.01/8.10
Mensajes: 40.821
Feedback Score: 7 reviews
|
Respuesta: Guia para instalar un ventilador electrico
ese estara bueno para calle con suerte, exigirle un poco al motor la temp se va a ir para arriba!!!
|
|
|
|
|
08-Dec-2010, 10:39
|
#22 | |
|
Banned
Fecha de Ingreso: 21-September-2010
Mensajes: 614
Feedback Score: 0 reviews
|
Respuesta: Guia para instalar un ventilador electrico
Cita:
el que tengo es similar y siempre anda a la mitad, aun asi le exija |
|
|
|
|
|
|
|


